StoryScraper is a new tool for making Google web stories. You can generate quality web stories in large quantities in a few clicks.
This article discusses how this tool works, the quality of web stories generated, customizability, pricing, and whether you should buy it. So, let’s dive in.
Already, knew about this tool? Click here to skip to the review.
What is StoryScraper?
StoryScraper is a versatile tool that employs AI automation to streamline the process of generating web stories on your WordPress website. With this tool, users can effortlessly create web stories with a simple click, based on keywords and URLs, while benefiting from a range of additional features.
It caters to a broad audience, from individual entrepreneurs to agencies, enabling them to craft captivating web stories, publish them on their blogs and social media platforms, and ultimately drive increased traffic and leads.
How it works
StorySrcaper scrapes data (text and images) from the given source (story URL, blog post, or keyword) rephrases it to remove plagiarism and generates a new story in your WordPress website. You can set the number of slides, text color, and text background as per your wish. You can also add a CTA button to drive traffic to your website.
First of all, you need to link your website with StoryScraper, either via the REST API method or using the StoryScraper plugin. Then you need to select the method to produce web stories. After this, enter the URL where you want to drive traffic, CTA button text, text color, and background and it starts working.
Why should you make web stories?
- Utilize visuals: According to HubSpot, 54% of consumers want more video content from brands they support. Stories blend video, audio, images, and text to create engaging multimedia packages that help viewers retain information and understand topics quickly.
- Improve search ranking: Stories are indexed as individual pages on your website and appear in relevant search results. Embedding them in blog posts enhances their visibility. Leverage this interactive format to reach a wider audience and present information in an immersive way.
- Increase website traffic: Web Stories can be shared and embedded across sites and apps, expanding their reach beyond a single ecosystem. Their interactive and engaging nature drives traffic and encourages sharing across the internet.
- Easy WordPress integration: Download the Web Stories plugin and use a conversion service like Quicktools by Picsart to format your content. These custom stories will quickly drive traffic to your site. Enable Google Analytics tracking to measure their performance.
How to use StoryScraper?
Firstly, you need to integrate StoryScraper with your WordPress website, either by using the REST API method or by installing the StoryScraper plugin (I recommend using the REST API method). Follow the below instructions to learn more.
Integration with your website
REST API method:
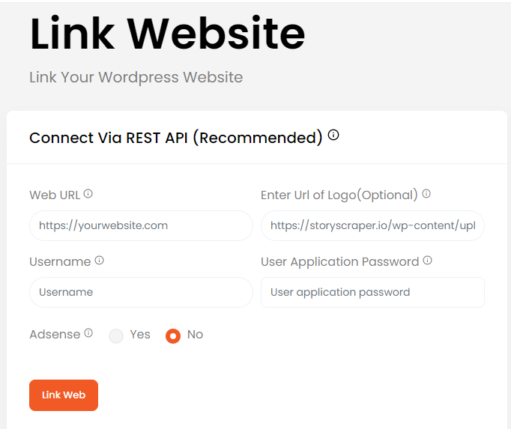
- Enter the website URL
- Enter the website logo (if any)
- Enter the username, the username should be the same as you use to log in to your WordPress dashboard
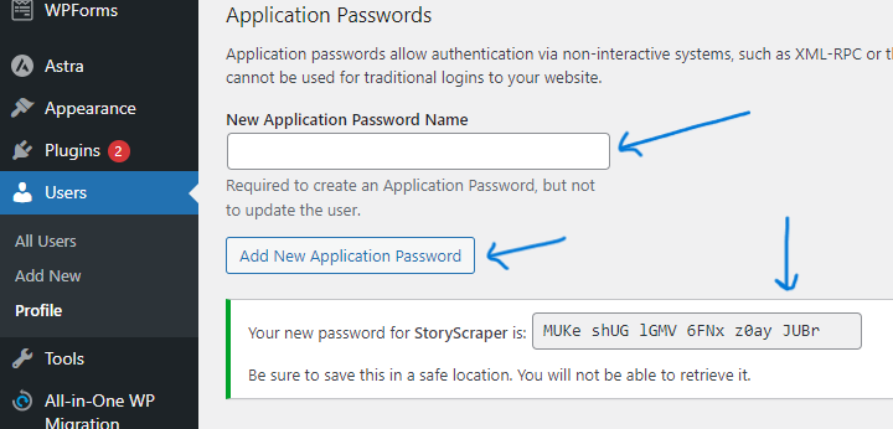
- For the password, go to your WordPress dashboard>Users>Profile. Scroll down to “New applicant password name”, and Give a name. Then click “Add new applicant password”, copy the password, and paste it into the “User applicant password” in the StoryScaper interface.
Plugin Method:
- Download the storyscraper.io plugin from here
- Install it on your WordPress website and activate
- Enter your StoryScraper email ID and password, Adsense details, and connect.
Creating web story
Go to the left navigation bar and look for “Tools”. It provides 3 options for making web stories:
Link to story
Here, the “Link” means the link to another web story or a web story RSS feed, please do not confuse it with a link to a blog post. It simply scrapes the images and text, rephrases the text, and makes a web story out of it.
If you want to scrape a single web story, select “SIngle story” and fill out the details like the number of slides, CTA URL, CTA text, category name, etc, and hit “Start magic”.
In this method, 1 credit will be consumed for every successful story created.
If you want to scrape multiple web stories or an RSS feed, choose “Bulk story”. If you are entering multiple URLs, please make sure they are comma separated.
Keyword to story
In this method, give it a keyword and it will automatically find the written content and images from the internet, and compile them to make a web story. However, I didn’t find it helpful when it comes to the latest keywords like ‘ChatGPT’ and ‘Midjourney’. So, please keep that in mind.
Here also, you need to fill in the details like the number of slides, CTA URL, CTA button text, and category and you will get a web story within a few minutes.
Here also, 1 credit will be consumed for every successful story created.
Post to story
In this method, you can convert a blog post into a web story. Just simply provide the URL of the source blog post and other details like in the previous two methods.
It will scrape all the information and images from the given blog post, rephrase the text, compile everything, and create a web story.
Here, 5 credits will be consumed for every successful web story created.
StoryScraper pricing
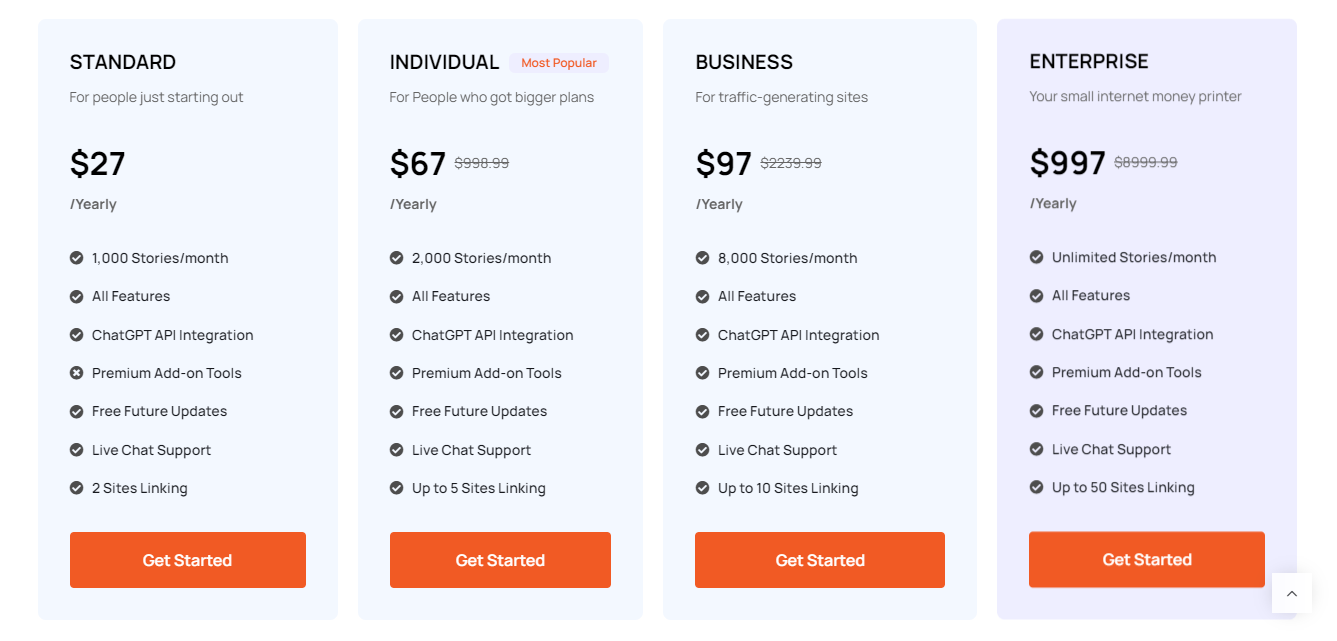
StoryScraper comes with 4 packages starting from $27 to $997 per year. They also have a trial package for $1 with 7 days validity and comes with 250 credits.
StoryScraper review: Based on my personal experience
While experimenting with the 7-day trial package, I discovered some pros and cons of this tool. I have also discussed some best and worst use cases, please read below.
Pros: What is it GOOD at?
Super cheap
This is the best thing about StoryScraper. The plan starts from $27 a year and you get 1000 credits a month. By which you can make up to 1000 stories a month, that’s one of the cheapest tools I have ever found!
User-friendly interface
To be honest, you don’t need to read any tutorial to use StoryScraper. Its interface is super easy, all you need to do is copy and paste the URLs, make some text adjustments and it starts working!
Bulk creation
You can create hundreds of web stories within a few clicks. Manually, it would take hours to do this job. All you need is the right source to scrape data and it will a lot of your time and money.
Chat support
They also have 24/7 live chat support on their website. The tool is backed by a committed community support team prepared to address any inquiries you may have and offer assistance whenever required.
AI Text Translation
You can also make the generated Story Texts more unique by translating them into different languages.
Best use cases
Out of all three methods of web story creation, the first one (Link to story) is the most useful.
But, to get the maximum benefit of it you need some high-quality web stories that can be scraped. Because, you know, it doesn’t create one on its own.
If you are working in niches like entertainment, health and fitness, travel, or food, this is going to be a very useful tool for you as there are plenty of high-quality stories available on the internet that can be scraped.
Cons: What is it BAD at?
Can’t change font style and size
You can’t change the font style and size, which is annoying and sometimes doesn’t fit the background image. However, you can reposition it.
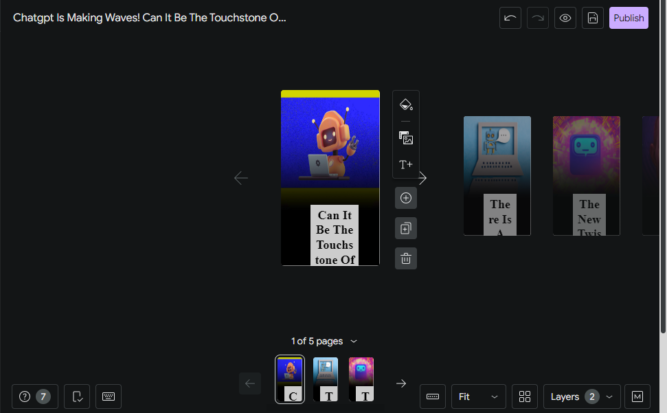
The text also looks weird on the editing page, but don’t worry it becomes standard in the actual story, you can check that by clicking on Preview as well.
Not so SEO-friendly
There are a few reasons why I found the stories created are not so SEO-friendly:
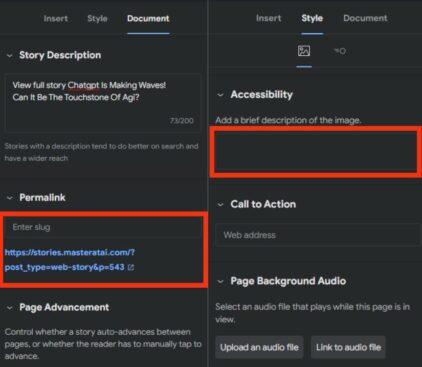
No keywords in slugs: it doesn’t add keywords in the slugs, instead it adds a random number which is not SEO-friendly at all.
No Alt texts: it doesn’t add any alt text for the images used and leaves it blank.
Scrapes irrelevant images
When using the ‘Post to story’ feature, it scrapes ALL the images on the page. Whether it is relevant to the article or not.
Let us understand with an example:
I pasted a link to one of my blog posts to create a story and see what it did…
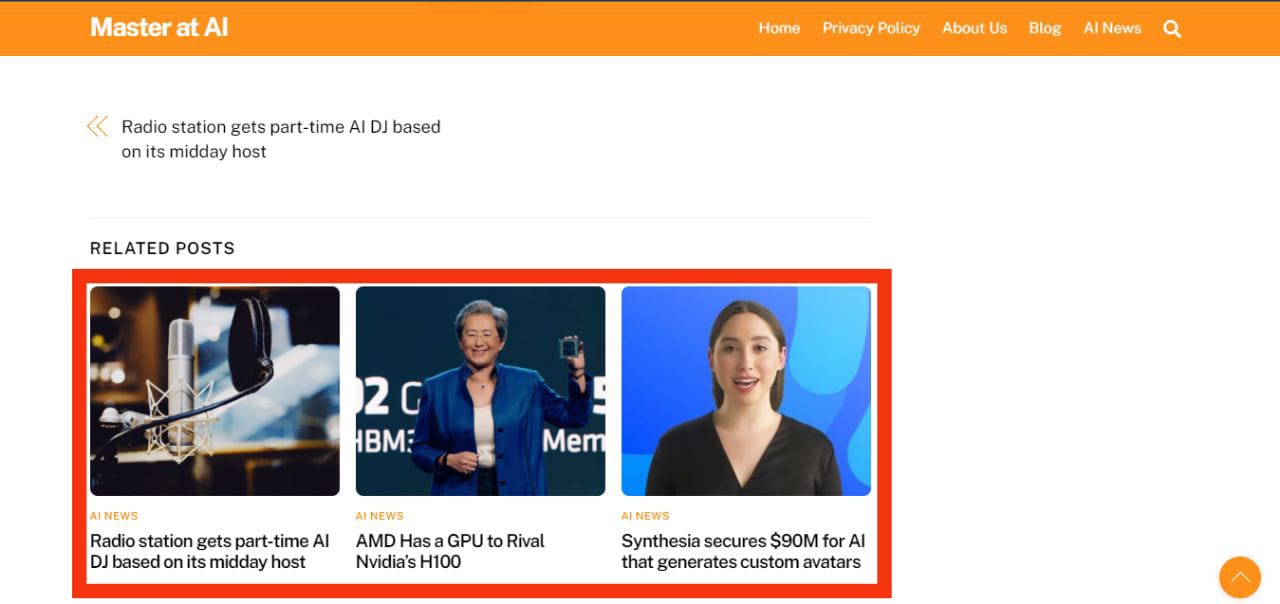

Here, it scraped the images from other posts shown in the preview at the bottom of the page and used them in the story, and for the remaining slides, it leaves them with a yellow background. This isn’t smart at all!
Worst use cases
The post-to-story method is the worst out of the three. It only takes pictures from the post provided and doesn’t add its own and sometimes adds irrelevant images (like I mentioned above)
To make this feature really work, you need a blog post with multiple images that also go well with the vertical orientation
Conclusion: Should you purchase it?
Certainly, yes! C’mon, it’s just $1 for a 7-day trial. As I mentioned, if you are working in one of the niches like entertainment, health and fitness, travel, or food this is going to be highly useful for you.
And if you are not working in one of those niches, you can still go for the 7-day trial, do some experiments with it, and maybe find a better way to use it.
Recommended services
If you want a real human-made web story, please check out this service. He manually makes professional web stories at a very affordable price.
FAQs
What does credit mean and is it recurring?
Story Credits serve as a means of quantifying the utilization of our AI tool. In simpler terms, One story credit is deducted for each successfully published story. All credits have a recurring nature and automatically renew every month.
Are stories AMP valid?
Yes, all stories are AMP valid!
Can I use Google Adsense with it?
Certainly, you can incorporate your Google Adsense Publisher code along with the Display ad slot code to showcase ads within stories.
Is it possible for this tool to scrape Web Stories from any website?
Our tool is compatible with 99% of websites that utilize the Google Web Stories plugin. Before scraping, it is advisable to verify the source site URL format (domain.com/web-stories/).
How can I access the Knowledgebase?
To find the Knowledgebase, please log in to your tool account’s “Dashboard.” On the left side of the screen, you will see the “Knowledgebase” section located under the ‘Help & Support’ category.
Refund policy
Sorry, once a plan on your account has been activated, they are unable to offer full or partial refunds. However, they have 24/7 live chat support to help you out.
Thanks man a well written post, Im using this tool from past few weeks got my website in Google discover 😌